Sunday, February 28, 2016

Finally, it's time to start! (pictures)

It's officially time to start planting seeds. *squeals*

At least some of them. Quite a lot to direct sow this year. All my tomatoes, Brussel sprouts, and Broccoli I start indoors now. Peppers and leeks will be started in another few weeks. Beans, rutabagas, peas, cukes, carrots, and a couple heads of lettuce will be direct sow and now my dad and I are going to garden share an area on his property. YAYAYAYAY!!!!

My identifier grid so I know what's drawn up.

Olaf sticker that is marking the corner so I can line it up with identifier grid.

This time of the year gets exciting and everything moves fast. I was browsing some pics of last years garden. It's all so bare now. I can't wait for it to look like that again.

This was early autumn, Some of the tomatoes were already done.

Back bed, zuchinni replacing carrots though you can see the few I left for seeds. And then beans taking off in the front and peas lagging just behind them. They didn't do very well.
I love the crazy things carrots will do when you don't thin them well, and sometimes when you thin them perfectly.

Some potatoes and half the onions from last year.

The biggest tomato we had last year.
I can't wait for my garden to be green again!

Saturday, February 20, 2016

Finding survivors

Made it to 40 today. Finally warm enough to be out without a jacket. I mean, next week it will be back to 20's but for now I ventured to the garden to see how things wintered over.

I found survivors, peeping out. Sort of like the groundhog. Is it time yet? Can I grow?

Do you see the green, right in the center? That's garlic. Plant bulbs in fall. It's sprouting. :)

The garlic bed, that for the last 3 years has been the onion bed. I found about 6 more sprouting garlic just at a glance.

The wild onions, which have been chewed on by bunnies.

And the celery, which is clearly growing indoors.

A few more days and I'll pull out my little indoor greenhouse and start tomato seedlings. It's almost time!

Wednesday, February 10, 2016

Spring

Spring is indeed springing. Despite the snow we have received and the single digit temps this morning, the ground is pulling at my toes, sometimes I feel my very soul. Begging me to be barefoot. All frostbite fears aside........


Preparations have begun. I have started a celery plant indoors which is growing nicely. I plan to transplant this to the outdoors, but I also want to keep one in the home. I just hate buying a full bag of celery to use 3 stalks for soup.


Seeds are all picked out and sorted, both the ones I saved last year and a few transplants. I need to pick up some onion sets, thank you for reminding me.


Last week of this month: Start tomato seeds.
Middle of March: Onion sets go in the ground. Also check on garlic. If it's sprouting, great! It lived through the winter. If not, assess whether that 4x4 can be used for another crop. Clear up garden beds, turn them up. Check winter compost pile to assess being added to bin.
Last week of March: Start pepper seeds. Possibly start broccoli at this time as well.
April: Watch seedlings and assess ground and weather for direct sow for carrots, beans.


As soon as evening temps are above 50 consistently out the door with all the seedlings.


Lots to plan and prepare. Why does winter take so long?

Thursday, February 4, 2016

Jam (pictures)

Fresh pineapple does not make jam. It will not gel. Just FYI


6 cups of fruit. I used roughly equal amounts of raspberries, rhubarb, and canned crushed pineapple.
4 1/2 tbls of pectin, low/no sugar kind
1 cup water
9 tbls lemon juice
1 1/2 cups sugar

Combine first 4 ingredients in large saucepan. Cook until your ingredients are soft. For this one it needed a little extra because of the rhubarb. If it had been all raspberries there would have been no extra time involved. By extra time, I mean a slow simmer for 2-3 minutes. Stir frequently.

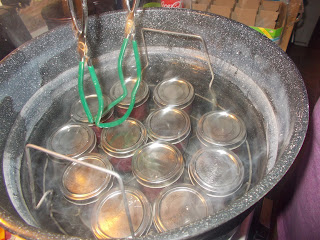
While this is happening, good idea to get your canner and your jars sterilized and ready. Here's how I do mine in the winter.
Once mixture reaches a hard boil for one full minute, add your sugar. Bring back to hard boil again for one minute. Some people do a test on the jam using a plate. Here's a pic of how I like my jam. Put a plate in the fridge ahead of time, put a small amount of jam on the plate and tilt plate. Called a gelling test or something like that.
Kinda of hard to see, but the ring around the outside is what gelled, the rest of the jam ran down and gelled at the point it stopped dripping. I cooked mine just a tinge longer. I like my jam a little runny.


At this point, if your jars are heated up and you are happy with your gel test, you can start filling jars!


Fill jars leaving a 1/4-1/2 inch of headspace. Process in boiling water bath for 10 minutes. Make sure to check your seals 24 hours later. Anything that didn't seal, needs to go in the fridge for consumption within a week or two.

This batch ended up being 12 jars. I am told that sometimes batches of jam over 10 jars do not set. I have not noted that in this batch. All jars sealed, so my small ones have homemade jam with mostly home grown fruits to consume for.........about 6 months. Next batch I'm planning strawberry-kiwi. :)